
WiFi Privacy Warning on iPhone: Encrypted DNS Traffic (Fix!)

Is your iPhone showing WiFi privacy warning in iOS 15? Are you aware that the network is blocking encrypted DNS traffic? This means that other devices on the same network can track your browsing activity. This problem can be caused by improper router configuration.
WiFi Privacy Warning in iOS 15

- To check if your iPhone or iPad is affected by this issue, you need to open Settings and press Wireless.
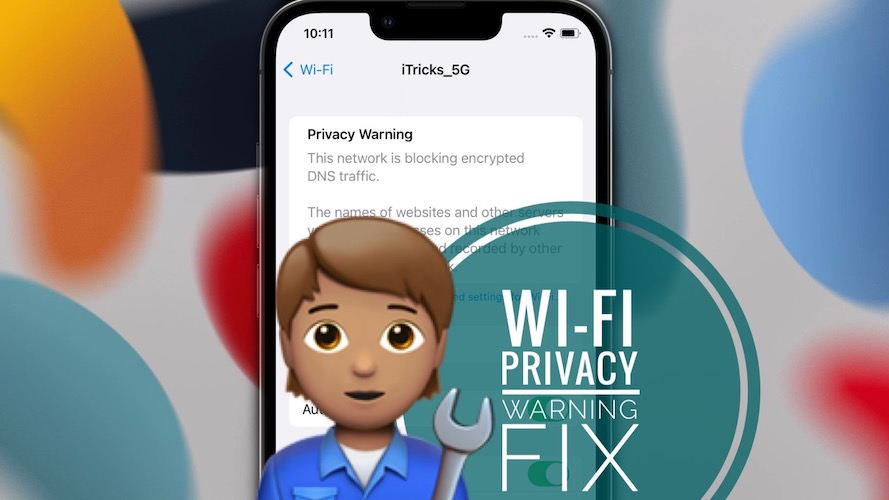
- Check the network you are currently connected to. Yes Privacy Notice is displayed below the name, press the blue button “i” icon available next to the Wi-Fi symbol.
- The Privacy Notice is detailed at the top of the screen:
“This network is blocking encrypted DNS traffic. The names of websites and other servers that your device accesses on this network may be monitored and recorded by other devices on this network.
WiFi privacy warning workaround

A quick way to suppress the warning is to turn off the Private Address option in the Wi-Fi network settings. As soon as you do that, the warning goes away.
Made: However, this is not an ideal solution, as you practically bypass the trigger and expose your iPhone to profiling on different Wi-Fi networks.
Update: This troubleshooting method triggers another Privacy Notice which informs you that the Private address function is deactivated. So, just forget about that and move on to the other fixes.
How To Fix WiFi Privacy Warning
Apple provides a supporting document with recommended settings for Wi-Fi routers and access points.
Before you go ahead and apply some of the suggested changes, be sure to back up your router settings, in case you need to restore them.
Also be aware that you might join the Wi-Fi network, so make sure you know the password.
1. Download the router application

If you haven’t managed your router from your iPhone via remote access, you need to check if your model has an iOS / iPadOS app available. Mine does it, it’s called Asus router. (direct link)
Download the app and open it. Use our administrator credentials to log in and allow the app to change some basic router settings and enable remote router access!
Made: This alone can solve the problem of WiFi privacy warning!
2. Update the firmware on the router
Since you’ve updated your iPhone or iPad to the latest available software update, make sure the router is also running the latest firmware:
On iPhone

- Open your router’s app, Asus Router Application, in this example.
- Press on Settings, available in the bottom menu.
- Go for Check the firmware version.
- Press orange Refresh button if an update is available. Be patient.
Advice: Internet connectivity will be interrupted while the router updates its firmware version.
On Mac (computer)

Open Safari and tap on your router’s login address. (For example http://192.168.1.1/ is the address of an Asus router) -> Log in as administrator -> Click on the current Firmware version -> Click on To verify to check for a firmware update!
Made: In my case, the firmware update fixed the WiFi privacy warning on iPhone and iPad!
3. Other recommendations
If the privacy warning persists, you should also check the following security settings:
- Avoid outdated security protocols such as Mixed Modes WPA / WPA2, WPA Personal, WEP and TKIP. Go for WPA2 Personal or higher such as WPA2 / WPA3 Transitional Where WPA3 Personal (the latest protocol, only works with devices supporting Wi-Fi 6 (802.11ax))
- Use a unique network name (SSID) – do not use common names such as linksys, netgear, dlink, wireless, Where 2 sons. Also, do not use different names for 2.4 GHz and 5 GHz bands.
- Hidden network put at Deactivated
- MAC address filtering, authentication, access control set to Deactivated
- Automatic firmware updates put at Enabled.
- Radio mode put at All (preferably), Where Wi-Fi 2 to Wi-Fi 6 (802.11a / g / n / ac / ax)
- Enable all supported bands
- Channel put at Auto
- Channel width put at 20MHz for the 2.4 GHz band & set to Auto Where all widths (20MHz, 40MHz, 80MHz) for the 5 GHz band
Did you successfully fix WiFi privacy warning on iPhone? Did the tips in this article help you? Do you have any questions or suggestions? Use the comments section.
Related: Are you familiar with the new privacy features included in iOS 15? Check them:
– iCloud private relay
– Hide my e-mail
– Protection of confidentiality of mail