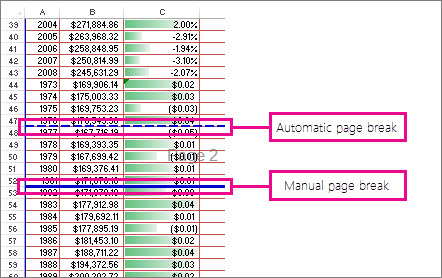
Inserting, adjusting, and removing page breaks in Excel are essential for controlling how your data is divided and displayed when printed. Page breaks determine where Excel starts a new page while printing. Here’s how you can manage page breaks:
1. Inserting a Page Break:
You can manually insert a page break to determine where Excel should start a new page during printing.
Method 1: Manual Page Break Insertion
- Select the row or column below or to the right of where you want to insert the page break.
- Go to the Page Layout tab on the Excel ribbon.
- In the Page Setup group, click on the “Breaks” dropdown menu.
- Choose “Insert Page Break.” Excel will insert a horizontal page break above the selected row or a vertical page break to the left of the selected column.
Method 2: Using the Page Break Preview
- Click on the “View” tab on the Excel ribbon.
- In the Workbook Views group, click on “Page Break Preview.”
- Adjust the page breaks by dragging them to the desired location.
2. Adjusting Page Breaks:
You can adjust existing page breaks to control how the data is divided across pages when printed.
- Switch to “Page Break Preview” by clicking on the “View” tab and then selecting “Page Break Preview.”
- Excel will display dashed blue lines indicating existing page breaks.
- To adjust a page break, hover your mouse over the dashed line until the cursor changes to a double-headed arrow. Then click and drag the page break to a new location.
3. Removing Page Breaks:
You can remove page breaks that you manually inserted or adjust existing page breaks to allow Excel to determine the optimal page breaks for printing.
Method 1: Manual Page Break Removal
- Switch to “Page Break Preview” by clicking on the “View” tab and then selecting “Page Break Preview.”
- Excel will display dashed blue lines indicating existing page breaks.
- Click on the page break line you want to remove to select it.
- Press the “Delete” key on your keyboard, or right-click and choose “Remove Page Break.”
Method 2: Clearing All Page Breaks
- Go to the Page Layout tab on the Excel ribbon.
- In the Page Setup group, click on the “Breaks” dropdown menu.
- Choose “Reset All Page Breaks” to remove all manually inserted page breaks.
Remember that Excel will automatically insert page breaks based on your printer settings and the size of the paper you are using. If you find Excel’s automatic page breaks aren’t optimal, you can manually adjust them using the methods described above.
By inserting, adjusting, and removing page breaks, you can ensure that your Excel data is well-organized and neatly presented when printed or exported to PDF.
