Excel in Office 365 is a very versatile application. The built-in functionality of Excel makes it the cornerstone of many projects. While we cannot predict or avoid all disasters, our response to these disasters can make a big difference. Our response to disasters is closely linked to our planning and preparation. An important tool in disaster preparedness is a Floor plan showing evacuation routes and emergency numbers. Microsoft Office 365 Excel can help you prepare your family or even your workplace for any eventuality. Microsoft Office 365 Excel has some features that will allow anyone with even basic skills to create a Floor plan showing escape routes.
Microsoft Office 365 Excel can also be used to make floor plans for room organization, seating arrangements and much more. With the built-in calculation function, you will be able to view the floor plan and make calculations if the plan is for the seats.
How to Create a Floor Plan Using Excel
Creating the floor plan with Office 365 Excel requires following these steps:
- Memorize or get the map of the region
- Draft on paper
- Get a mouse instead of using the touchpad
- Remember where all the entrance stairs are
- Go paper to Microsoft Office 365 Excel.
Let us show you how to create a Floor plan using Excel.
There may be a time when you want to make a floor plan, arrange seating or organize a room. You may have a limited budget, so you can’t get the software to do the job. You can have the skills to do the layout, so you don’t need to hire a professional. Well, you already have the perfect tools, Microsoft Office 365 Excel, your creativity and your skills, and the time.
1]Memorize or get the map of the region
Review the space a few times to get a mental picture of the layout. You can walk with a pencil and paper to sketch the space for which you want the plan. Take note of the important points you need to remember. If this is a floor plan for the emergency route, you may want to note the stairs, elevators, fire extinguishers, etc. after the sketch, try to follow the plan on paper and see if it corresponds to the space. The same goes for the floor plans for the emergency route, the seating arrangement or the space to be designed / decorated.
2]Draft on paper
Drafting on paper is important because it will help you remember. When you go to design in Excel, you may think you remember it, but you may miss important details. The draft will also give you an idea if you are on the right track when you compare to Excel.
3]Get a mouse instead of using the touchpad
If you’re using a laptop, it’s best to use a wired or wireless mouse instead of the touchpad. An external mouse will provide more comfort and precision. You can get a simple, affordable mouse or opt for a sophisticated mouse. Whichever you choose, the external mouse will make the design in Excel more comfortable and more precise.
5]Go from paper to Microsoft Office 365 Excel
Now let’s get to the fun part of formatting in Microsoft Office 365 Excel. Excel is made up of grids. These grids help make it more precise when you’re trying to align things perfectly. These grids can be difficult to work around when you need to create curves in a design, but a little creativity, imagination, and some Excel functionality will help.
If your design has functionality on all sides, it’s best to fit it in the middle of the Excel sheet. Make sure the start is correct, otherwise it will affect the rest of the design. Corrections can take a long time. Choose the area and start with the general shape of the structure or space you want to design.
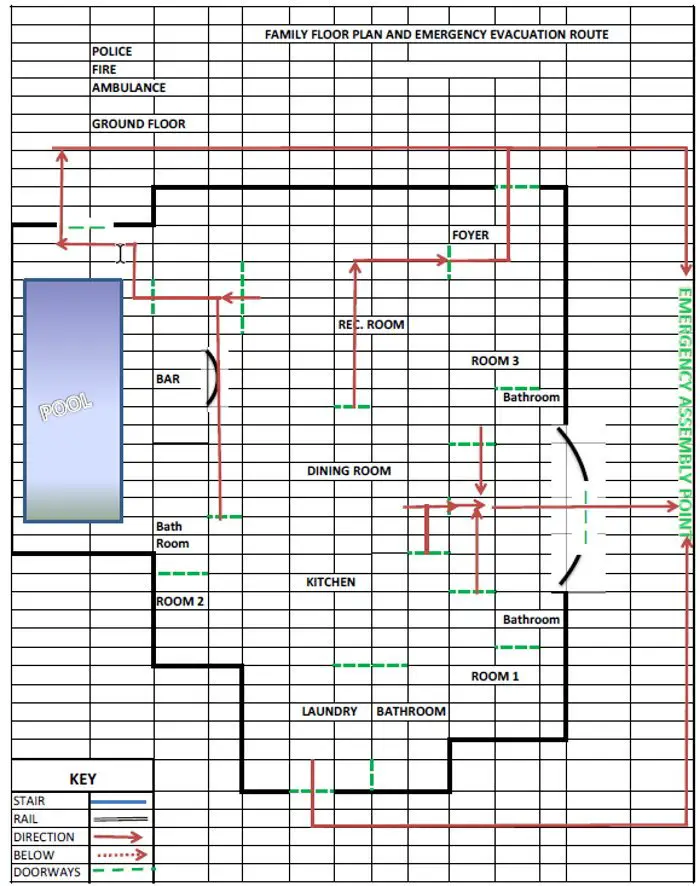
You will use thick borders to show the walls or main borders. Thinner borders can be used to show interior walls and partitions, and dotted lines to show doors. Other functions can be represented by your choice of articles. Make sure to include a key so people understand.

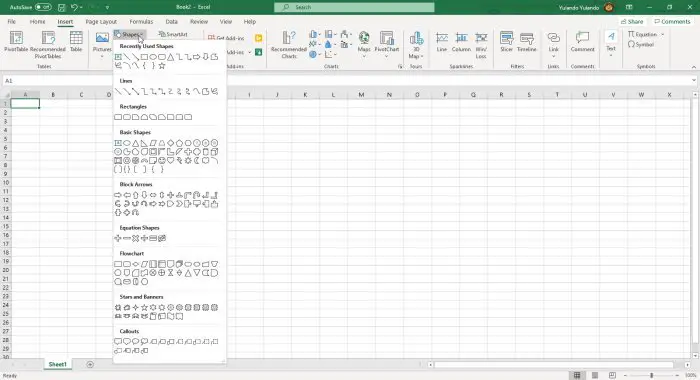
Shapes are extremely useful when features cannot be created with grids. Shapes such as lines, arcs, squares, etc. Shapes can be used to represent objects such as tables, also used to represent curved areas of the plane and accesses.

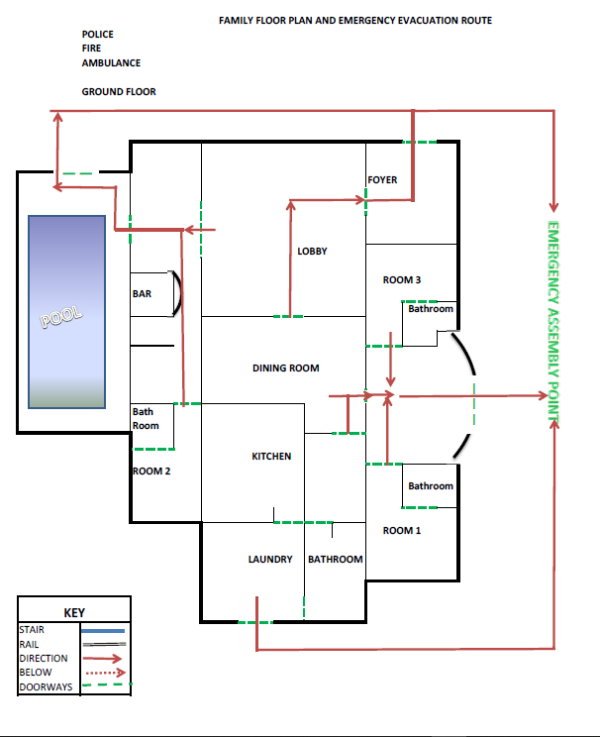
The finished floor plan with all rooms in place using the various features of Microsoft Excel. The grid lines are still displayed in Microsoft Excel. The grid lines will not be printed by default, they will have to be defined. In the print segment, you will be shown how to print the grid.

A floor plan, a room plan or any other finished plan must be clear and precise. Anyone reading the floor plan should be able to see what needs to be done. Microsoft Office 365 Excel makes the floor plan clear and easy to read.
Printing your floor plan in Excel

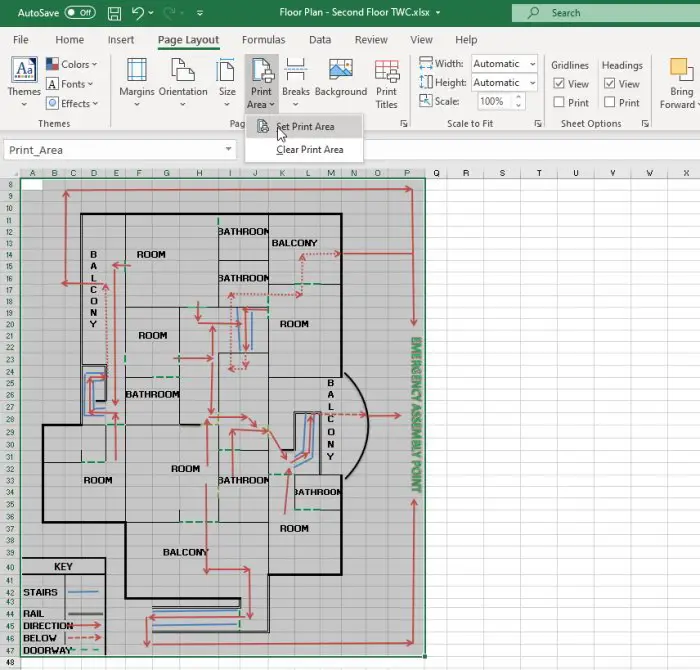
The first step before printing is to see the number of sheets on which the floor plan is located. Create a print area to eliminate wasted paper. The printing area would be the section with the floor plan and information.
To define the print area, select the areas you want to include, go to Layout, Click on Printing area, then click Define the print area. If you decide to change or delete the print area, go to Layout, Click on Printing area, then click Clear print area

The paper size can be changed to facilitate a larger plan on a single sheet. Margins could also be changed to fit the floor plan on one sheet. You can choose to keep the grid lines in the final print or make the print clear with only the lines of the floor plan. To print the grid, go to Layout then go to Grid line and select Impression.
Microsoft Office 365 Excel, like other Microsoft Office applications, is very versatile. They can do a lot more than you can imagine. It is extremely easy to navigate in Excel to create Floor plans and any other plan. Microsoft Office 365 Excel is an application to consider for simple and economical plan designs. It requires little or no technical skills and anyone familiar with Microsoft Office 365 and Excel can use it to create a floor plan.
Read more: How to use the TRUNC function in Microsoft Excel.

