The Windows team removed the option to postpone the upgrade to the next feature update for almost a year. The problem is that many consumers want to postpone the installation of a feature upgrade for several valid reasons. Although Microsoft has removed this functionality, they have added new functionality. Windows 10 version 2004 allows you to stay on a particular version until the version reaches end of life. In this article, we will show how you can prevent Windows 10 from moving to the next version.
Prevent Windows 10 from upgrading to the next version
There are two ways to do this. Group Policy is available in Windows 10 Pro and Enterprise, but not for the Windows 10 Home version. But you can use the registry method to get the same thing in Windows 10 Home. This method also gives you the power to access the exact version of Windows and not force the upgrade to the latest version of Windows 10.
You can activate the Select the target version of the feature update Group Policy setting or use the TargetReleaseVersionInfo Registry key to prevent Windows 10 from installing the next feature update. You will need administrator permission and access to Group Policy or the registry will apply them.
Select the target features update version in Group Policy
Type gpedit.msc in the Run prompt (Win + R) and press the Enter key
Go to the following path
Computer Configuration > Administrative Templates > Windows Components > Windows Update > Windows Update for Business
Double click on the policy – Select the target version of the feature updateand set the status to Activated.
Activate this policy to specify an update version of the features to request in the following scans.
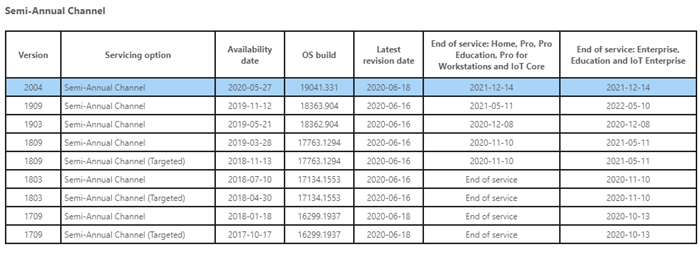
In the text box where you must enter the version, enter the exact value as you go see in the published page

If you choose v1909, the Windows update will download 1909 and keep it on that version until it expires. Usually when you install an older version, you get a prompt for a newer version and compatibility. This policy ensures that you stay in the same version until you delete or deactivate the settings.
Set the value of the TargetReleaseVersionInfo registry key

Open Registry Editor by typing Regedit at the Run prompt (Win + R), then press the Enter key.
Move towards:
HKLMSOFTWAREPoliciesMicrosoftWindowsWindowsUpdate
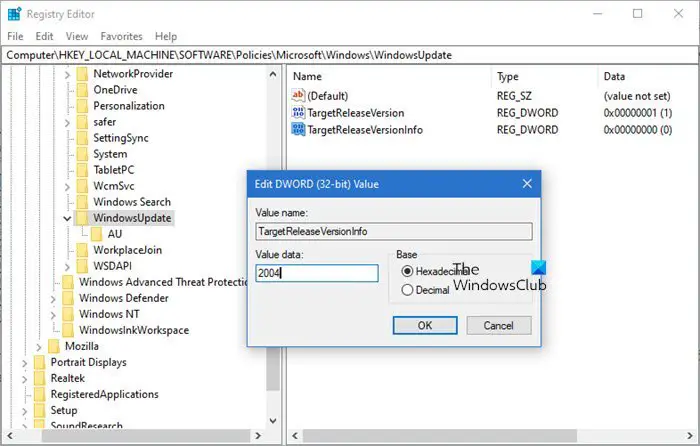
Find two DWORD files and set the value as below. If they do not exist, create them as follows:
- TargetReleaseVersion = 1
- TargetReleaseVersionInfo = 2004
The value must be the exact number as in the semi-annual string list in the link above. Replace 2004 with the appropriate version you want.
Then you will have to restart the computer. Once the restart is complete, log in and go to Windows Update, and check the version of the update available for download. Once installed, it will remain on this version.
While Microsoft removed the deferred setting, but in exchange for that, you get a great option that you can also call the Feature update selector.
I hope the message will help you prevent Windows 10 from moving to the next version.

- Keywords: Features, Windows Updates
