LDAP signature is an authentication method in Windows Server that can improve the security of a directory server. Once activated, it will reject any request that does not require a signature or if the request uses non-SSL / TLS encryption. In this article, we will explain how you can enable LDAP signing on Windows Server and client computers. LDAP stands for Lightweight Directory Access Protocol (LDAP).
How to enable LDAP signing on Windows computers
To ensure that the attacker does not use a spoofed LDAP client to modify the server configuration and data, it is essential to enable LDAP signing. It is also important to activate it on client machines.
- Define server LDAP signature requirement
- Define client LDAP signing requirement using local computer policy
- Set the client LDAP signing requirement using the domain Group Policy object
- Define client LDAP signing requirement using registry keys
- How to check configuration changes
- How to Find Customers Who Don’t Use the “Require Signature” Option
The last section helps you understand the customers who required signature is not activated on the computer. It is a useful tool for IT administrators to isolate these computers and enable security settings on computers.
1]Define server LDAP signature requirement
- Open Microsoft Management Console (mmc.exe)
- Select File> Add / Remove Snap-in> select Group Policy Object Editor, then select Add.
- It will open the Group Policy Wizard. Click the Browse button and select Default domain policy instead of the local computer
- Click the OK button, then click the Finish button and close it.
- To select Default domain policy> Computer configuration> Windows settings> Security settings> Local policies, then select Security Options.
- Right click Domain controller: LDAP server signing requirements, then select Properties.
- In the Domain Controller Properties: LDAP Server Signing Requirements dialog box, enable Set this policy setting, select Require signature in the Define this policy setting list, then select OK.
- Check the settings again and apply them.
2]Define client LDAP signing requirement using local computer policy

- Open the Run prompt, type gpedit.msc and press the Enter key.
- In the Group Policy Editor, go to Local Computer Policy> Computer Configuration> Policies> Windows Settings> Security Settings> Local Policies, then select Security options.
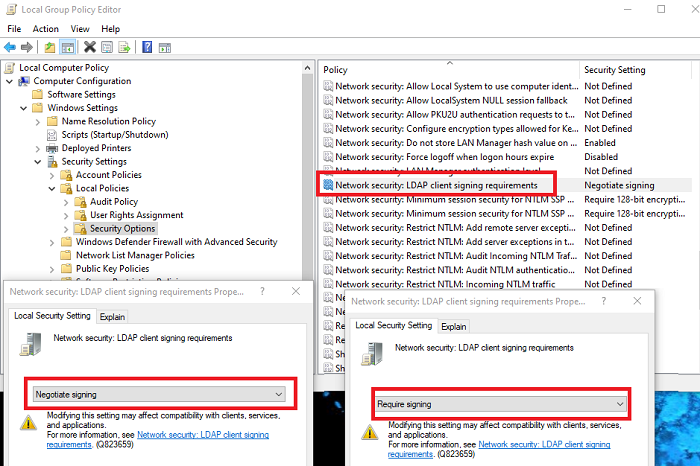
- Right click on Network security: LDAP client signature requirements, then select Properties.
- In the Network Security: LDAP Properties Client Signature Requirements dialog box, select Require signature from the list, then choose OK.
- Confirm the changes and apply them.
3]Set the client’s LDAP signing requirement using a domain Group Policy object
- Open Microsoft Management Console (mmc.exe)
- To select File > Add / Remove Snap> to select Group Policy Object Editor, then select Add.
- It will open the Group Policy Wizard. Click the Browse button and select Default domain policy instead of the local computer
- Click the OK button, then click the Finish button and close it.
- To select Default domain policy > Computer configuration > Windows settings > Security settings > Local policies, then select Security options.
- in the Network Security: LDAP Client Signature Requirements Properties dialog box select Require signature from the list, then choose Okay.
- Confirm the changes and apply the settings.
4]Define client LDAP signing requirement using registry keys
The first thing to do is to make a backup of your registry
- Open the Registry Editor
- Move towards HKEY_LOCAL_MACHINE SYSTEM CurrentControlSet Services
Settings - Right click on the right pane and create a new DWORD with the name LDAPServerIntegrity
- Leave it at its default value.
5]How to check if configuration changes now require a connection
To make sure the security policy works here, here’s how to check its integrity.
- Connect to a computer on which the AD DS administration tools are installed.
- Open the Run prompt, type ldp.exe and press the Enter key. This is a user interface used to navigate the Active Directory namespace
- Select Connection> Connect.
- In Server and port, type the name of the server and the non-SSL / TLS port of your directory server, and then select OK.
- When the connection is established, select Connection> Link.
- Under Connection type, select Single connection.
- Type the user name and password, then select OK.
If you receive an error message saying Ldap_simple_bind_s () failure: strong authentication required, then you have correctly configured your directory server.
6]How to Find Customers Who Don’t Use the “Require Signature” Option
Each time a client computer connects to the server using an insecure connection protocol, it generates event ID 2889. The log entry also contains the IP addresses of the clients. You will need to activate it by setting the parameter 16 LDAP interface events diagnostic parameter 2 (basic). Learn how to configure logging for AD and LDS diagnostic events here at Microsoft.
LDAP signing is crucial and I hope it has been able to help you understand clearly how you can enable LDAP signing in Windows Server and on client devices.
