AirDrop remains one of the best ways to transfer large files from iPhone or iPad to Mac and vice versa. If you save lots of videos or photos on iPhone, you probably use AirDrop to send them to MacBook for editing and sharing. But what if your MacBook isn’t showing up on your iPhone? Follow the troubleshooting steps to resolve the issue.
Since there are several reasons behind the problem, we will start with the basics and move on to the advanced tips to fix the problem with AirDrop.
Confirm AirDrop issues on Mac
Before you start troubleshooting, you need to confirm the problem with your Mac. You can use another iPhone or iPad and see if the Mac appears in the AirDrop menu. If your MacBook appears, the problem is with your iPhone. If your MacBook isn’t showing up in anyone’s AirDrop menu, the MacBook is the real culprit here.
1. Check AirDrop discovery settings
First, you need to make sure AirDrop is enabled on your Mac and make it visible to everyone. If AirDrop from your Mac is only visible to your contacts, it might not appear on your friend’s iPhone or iPad. Let’s make the relevant changes from Control Center on Mac.
Step 1: Click the Control Center icon in the upper right corner of the menu bar on Mac.
2nd step: Click the AirDrop icon and enable it.

Step 3: Select Everyone from the same menu.

You can also change AirDrop settings from the Finder menu.
Step 1: Open Finder on Mac.
2nd step: Select AirDrop from the side menu.
Step 3: Expand the “Allow me to be discovered by” menu and select “Everyone”.
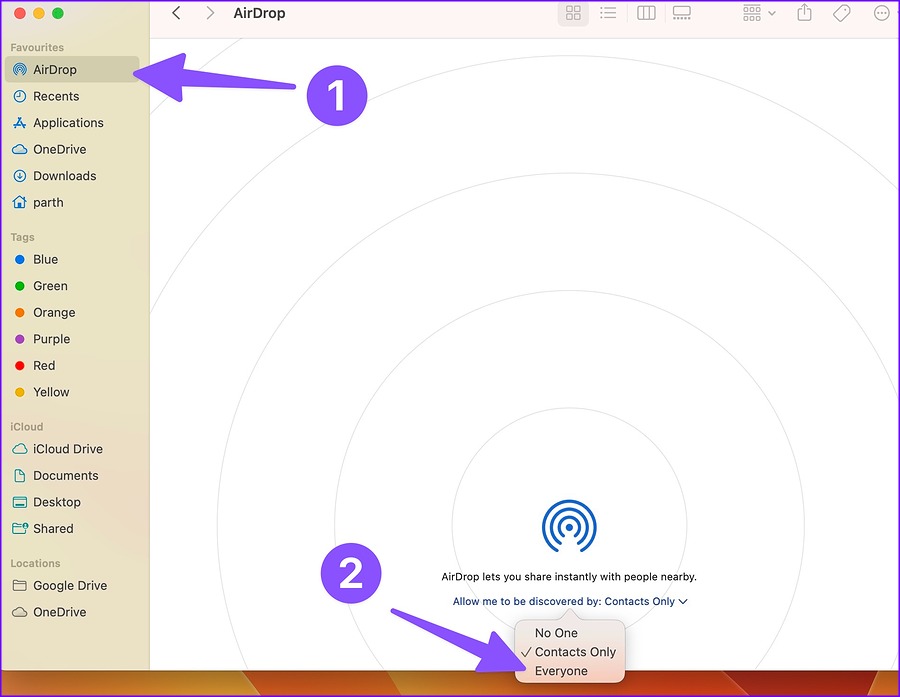
After completing the process of transferring files from your friend’s iPhone, restore the ability to discover AirDrop to Contacts for privacy. After all, you don’t want your MacBook showing up on everyone’s iPhone in a crowded place.
2. Restart Mac
A simple Mac restart fixes issues like device not showing up in AirDrop.
Step 1: Click on the small Apple icon in the upper left corner.
2nd step: Select Restart.
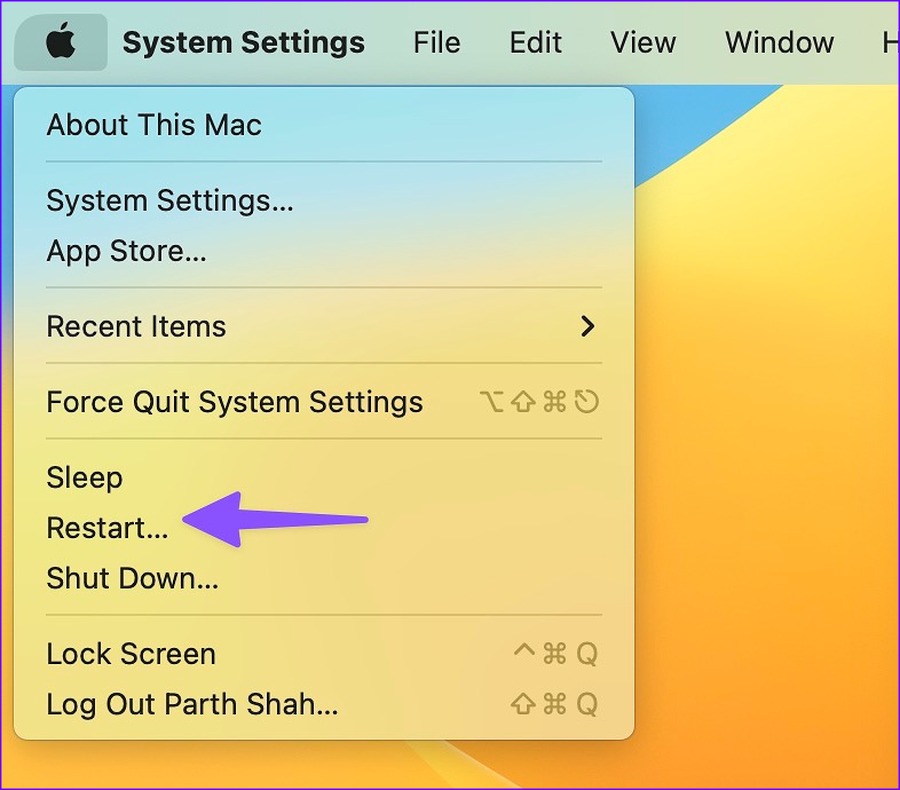
After your MacBook restarts, check if the device shows up in the AirDrop menu.
3. Enable Wi-Fi and Bluetooth
You will need to enable Wi-Fi and Bluetooth on both sender and receiver devices to send files via AirDrop. Swipe down from the top right corner to bring up Control Center on your iPhone and enable the Bluetooth and Wi-Fi toggles. Similarly, open Control Center on Mac to enable Bluetooth and Wi-Fi.

Now select multiple files on your iPhone and open the AirDrop menu. Your MacBook should appear in the list.
4. Disable focus
Focus is Apple’s advanced version of NPD on Mac. An active Focus mode can disrupt AirDrop discovery on Mac. You need to disable focus and try again.
Step 1: Open Control Center on your Mac.
2nd step: Disable focus and try again.
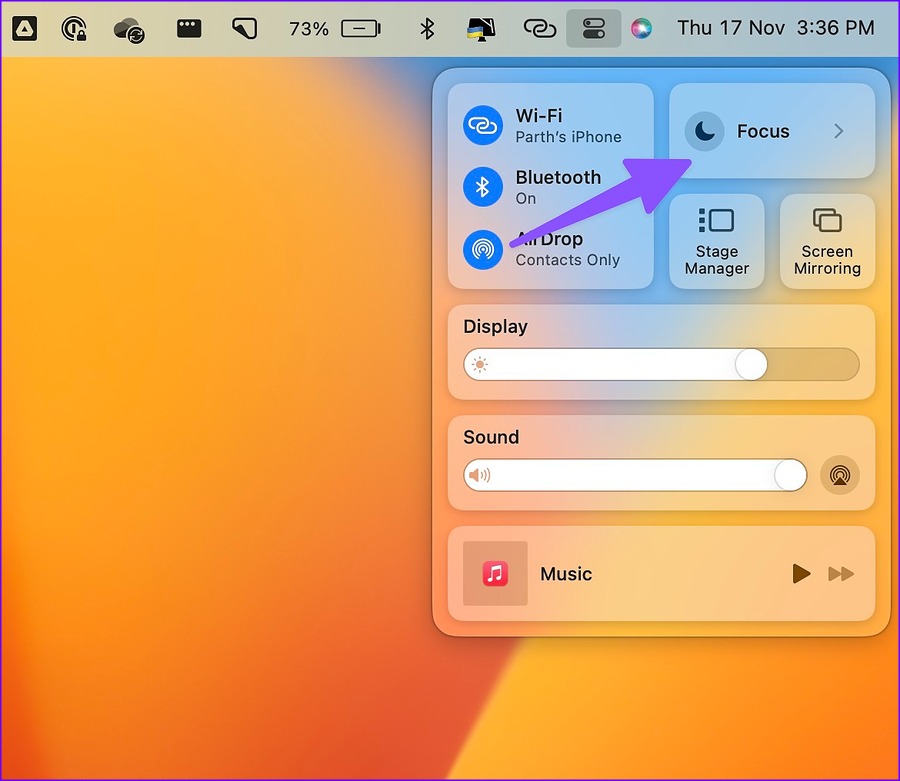
You can also disable focus from system settings.
Step 1: Press Command + Space keys and find System Settings.
2nd step: Press Back and select Focus from the sidebar.

Step 3: Select a focus mode and deactivate it.
5. Keep devices closer
Physical interference such as a thick wall or door can affect your MacBook’s AirDrop detection capability. If you or your friend is trying to AirDrop files from another room, office, or a fair distance, ask the person to come closer to your Mac.
6. Check firewall settings
An active firewall setting can block all incoming connections to your MacBook. Here’s how you can turn it off.
Step 1: Open Mac System Settings (refer to the steps above).
2nd step: Select Network and click Firewall.
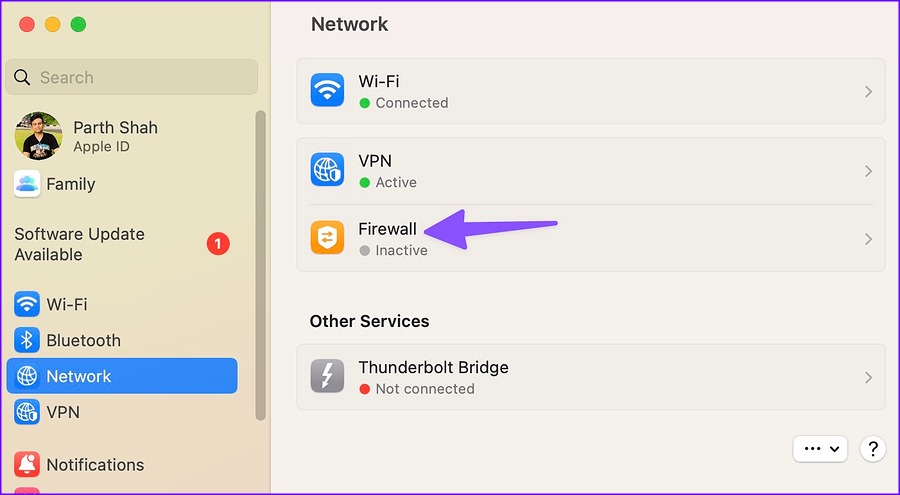
Step 3: Click Options.

Step 4: Disable “Block all incoming connections”.

7. Reset your Mac’s Bluetooth
Problems with your Mac’s Bluetooth can prevent the device from showing up on AirDrop. It’s time to reset Bluetooth on your Mac.
Step 1: Press Command + Space keys and search for Terminal to open it.
2nd step: Dough sudo pkill bluetooth and press the Return key.

Enter your Mac password to authorize the command. It will disconnect all Bluetooth devices and refresh the Mac’s Bluetooth module.
8. Update macOS
Apple regularly releases updates to add new features and fix bugs. MacBook not showing up on AirDrop may be due to an outdated version of macOS.
Step 1: Go to System Settings and select General from the left sidebar of your Mac.
2nd step: Select Software Update and download the latest version of macOS to your MacBook.

Transfer your files in no time
Instead of using slower and inconvenient methods like data cable, iCloud or OneDrive, fix MacBook not showing up on AirDrop and share large files without breaking a sweat.
