The Gmail confidential mode feature would also allow you to set an expiration date for the email. Once this period has elapsed, the recipient will no longer be able to consult this mail. The same is true for any attachment that he may have. Not only that, you can even prevent the entire mail from being transferred or its contents being copied. In the same vein, downloading the attachment could also be blocked.
To make it even more secure, Google has also added two modes of protection. One is the standard mode while the other is SMS code. If you chose the Standard Google then sends the recipient a password if it does not use the Gmail application. However, if he uses it, he simply needs to log in with his Gmail ID and password. While in the case of the SMS code, the recipient will receive the code by SMS. The second mode is independent of whether it uses the Gmail application or not. He will always have to enter the password received by SMS to display the contents of the mail.
All mail sent in confidential mode is always locked with this code. Therefore, only the recipient with the correct password could open it. So, with this necessary information in hand, refer to the instructions below to learn more about the confidential mode of Gmail. This mode works in both the Gmail app and in the desktop version. Plus, if this feature really intrigues you, do not forget to check out 3 new Gmail features that you should know about.
Sending e-mails in confidential mode
- Open the Gmail application on your Android device.
- Tap the plus icon at the bottom right to start writing a new mail.
- Once in the Write an email section, tap the three points present in the upper right corner.
- To select Confidential mode in the drop-down menu.
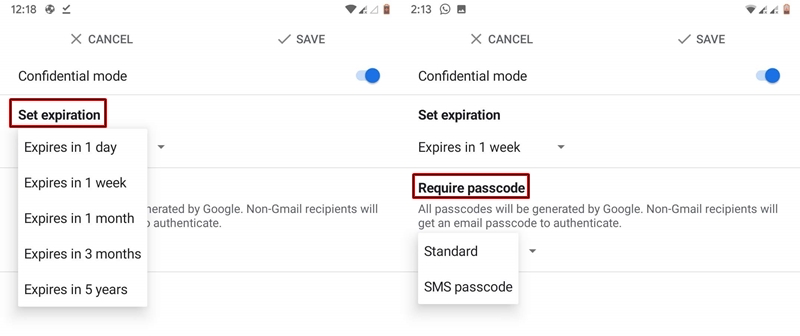
- Under the Set expiry section, tap the drop-down arrow and select the period after which the mail should expire. Once the mail reaches this stipulated time, the recipient will not be able to see any of its contents (or attachments).
- When it comes to the confidential mode in Gmail, you have two protection modes (present under the Require a password section): Standard mode (code of access by mail) or SMS code (SMS access code).
- Choose the one you prefer and press to save top right to finalize all your choices.

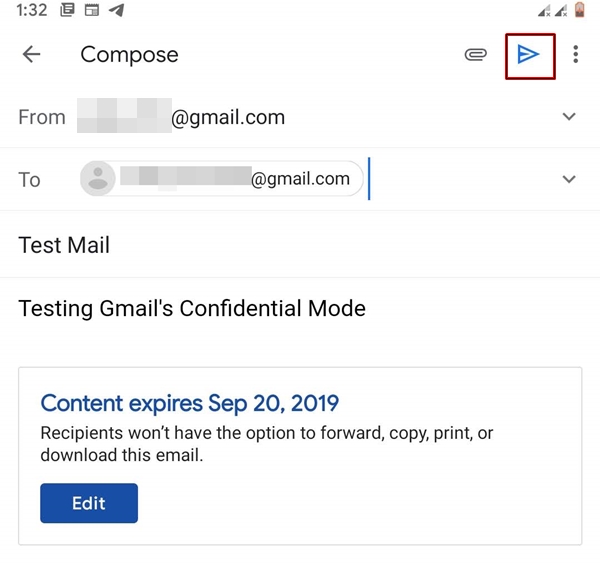
- Go back and now you could see the The context expires message in the compose mail. Just tap on the to send button to deliver your mail.

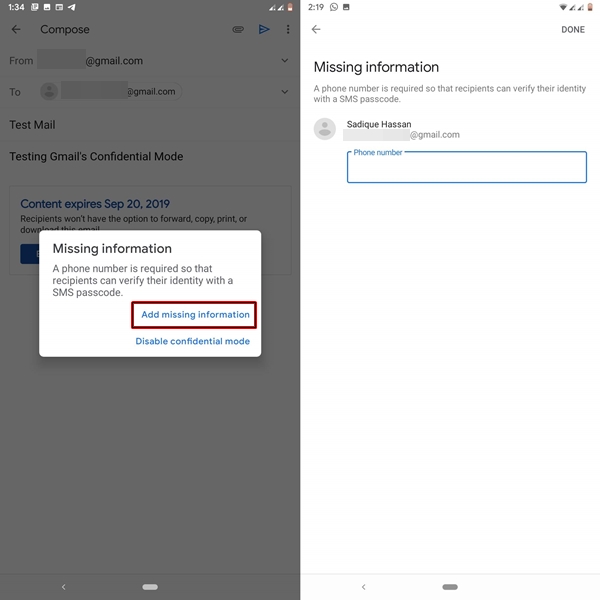
- Moreover, if you chose the SMS Authentication codeyou will then need to add the recipient's phone number. Press on Add missing information in the dialog box that appears.
- On the next screen, you will now need to enter the recipient's phone number and press COMPLETED.

With that, you have finished sending emails in Confidential mode in Gmail. Now go to the next section and see how to display these confidential emails when someone sends them to you. In addition, it is only one of the many amazing tips related to Gmail. To learn more, check out 7 Gmail Tips and Tricks for Android.
View emails in confidential mode
If the sender sent you the confidential mail, there may be two cases, he chose the SMS code mode or the standard mode. We will discuss the two cases below.
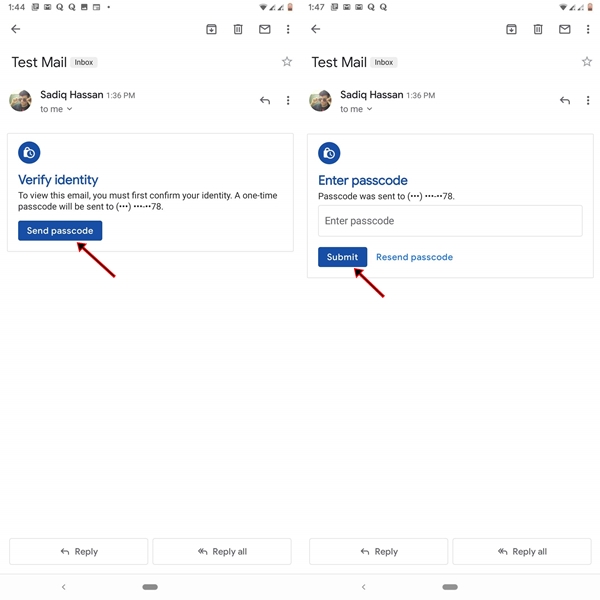
- Go to your Gmail Inbox. if you received the mail with SMS code security, you will need to verify your identity. Press the Send the code button. This will send you a One-time password (OTP) on the number below. If you do not receive an authentication code, wait a moment and then press Return the access code. Or ask the sender to double check the number that he has entered.
- Now enter the code you just received and tap Submit. if all goes well, you will be able to see all the content of the mail until it expires.

- Whereas, if the sender has selected the Standard In mode, you can directly open the mail and read its contents. But this only applies if you have the Gmail app. Otherwise, you will need to enter the code you will receive by email.
With this, we conclude our detailed guide on how to send and receive confidential emails in Gmail. Share your views and queries, if any, in the comments section below.
Read more: How to recover deleted emails permanently in Gmail


