If you use Microsoft Outlook for PC and you want create a contact group, you can follow this method to create a contact group or distribution list to send mass emails or invitations. No additional or additional service is required.
What is a contact group in Outlook for PC
The contact group (formerly Distribution List) is a list of people or email addresses that you can use to send email to more than one person at a time. If you are creating a group or contact list, you do not need to enter all of the email IDs for a set of recipients when sending an email. This is useful when you want to send multiple emails to multiple people frequently.
It is possible to create a contact group in Outlook for Office 365, Outlook 2019, 2016 and other older versions. In this article, we have shown how to do this in the Office 365 version.
Create a contact group in Outlook for Office 365
To create a contact group in Outlook for Office 365, follow these steps:
- Click on the Contacts icon to see the contacts
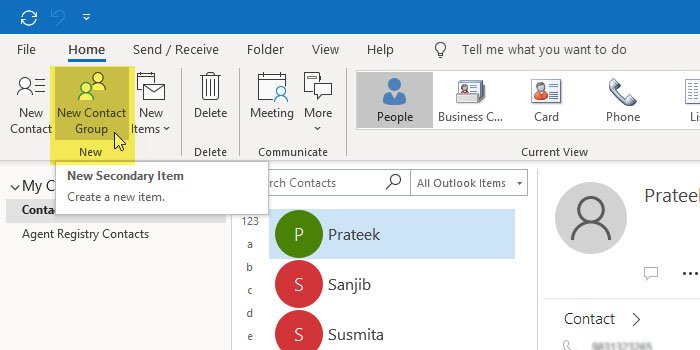
- Click on the New contact group option
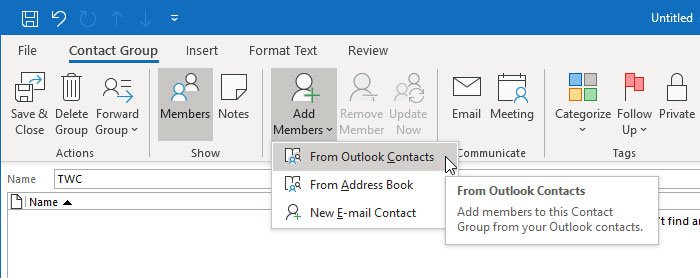
- Name your contact group
- Click the Add members button and select a source from your contact
- Choose contacts to add them to the list
- Click the Save and Close button
To start, open Outlook on your Windows computer and click on the People in the navigation bar. In case you are using the extended version of the navigation bar, you must click on the text “People”.
You should now see all of the contacts you saved in the Contacts app earlier.
Make sure you are on the Home tab, then click on the New contact group icon visible in the ribbon.

A new window will appear where you will need to enter the name of your new contact group. You can use whatever you want to recognize the list in the future.
After that it’s time to add all the contacts to the group. To do this, click on the Add members button. You should find three options, and they are – From Outlook contacts, From the address book, and New email contact.

If you saved someone’s contact information earlier, you need to select an option between From Outlook contacts and From the address book. However, if you want to add a new email ID now, you need to choose the third option. After adding all the contacts to the group, click on the Save and close button.
The best thing about this method is that you can add a previously created email or contact list to a new group. This will create a nested group, in other words.
Related reading:
- Send bulk emails to multiple contacts using the people contact list in Outlook.com
- How to create an email list to select multiple contacts at once in Gmail.
