
Some of you may be using it for a long time, but not everyone is on the same wavelength as you. In addition, the functionality is buried deep inside and does not do justice either. So let's start the guide and look at the steps to add a signature in Gmails. Just for your information, this method is applicable even if you send emails in confidential mode.
What are signatures in Gmail?
The signature in Gmail is no longer an identity, which describes the sender of the email. This will also help increase the authenticity of your email. But one of the main advantages of this feature is the saved time and effort. For example, business emails usually end with the keyword Regards, followed by the sender's name, location, and contact information (in some cases). Suppose you have to send many emails in one day. in such cases, you will need to enter the same information each time, which will result in unnecessary time and effort.
This is where the Gmail Signature feature is very useful. All you have to do is insert this information into your signature and Gmail will automatically add it to each mail that you are about to send. In addition, you can even add an image representing your organization, a digital signature, etc. Follow the instructions below to add your customization. In addition, do not forget to check 7 tips and tricks of Gmail for Android secret for more tips.
Adding custom signatures (Windows)
- Open Gmail on your desk and head to Mailbox.
- Now click on the gear icon what would be the most right icon, just above your emails.
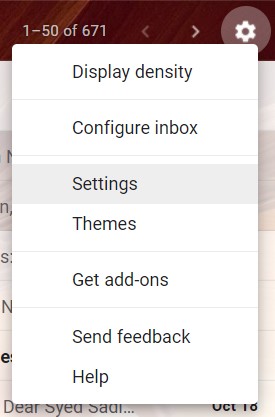
- In the drop-down menu, select Settings. Now you should automatically be taken to the General tongue. Otherwise, select the same in the top menu bar.
- Now scroll down until you reach the Signature section of Gmail.

- Click on the second circle, just below the No Signature option, as shown in the image.
- Enter the required information that you want to display in the Gmail Signature section. You can also use various formatting features. This includes making the text bold, italic, change its size, color, style, etc. However, if you use professional e-mail, it is not recommended to do so.

There is one important feature, however, that you must try. In my signature above, you may notice the LinkedIn image. This is not just an image, but contains the link to my LinkedIn profile. Even if you can create an identical hyperlink on LinkedIn text, your email will be more enjoyable to watch. Go to the next section and learn how to add images to the Gmail Signature section.
Did you delete an important email by mistake? Refer to the guide for how to recover permanently deleted emails in Gmail.
Adding images and links to signatures
First, get your hands on the image, as well as the URL of the profile you want to view. This can be any profile, Facebook, Twitter or even YouTube. Once you've downloaded the image and your copied profile URL, follow the steps to add images to your signature in Gmail.
- Go to your Signature section under Settings > General.
- Click on Insert an image icon. You can now add an image from Google Drive, a hard drive or the Web.

- The added image will now appear in your signature. Click on it once and choose the desired size of the image.

- Now, to create a hyperlink to your profile, select the entire image and click the Link icon.

- Under Linked to, to select Web address and enter the URL of your profile. Once done, click D & #39; AGREEMENT. You have added a hyperlink to an image of your signature in Gmail.


That's it. Now you can start sending emails with your personal signatures. However, if you want to send them later, learn how to send scheduled emails in Gmail. Let's now move our attention to the Android version and see how to add signatures in the Gmail app on Android.
Add a signature in the Gmail app (Android)
In the Gmail app, you can only define text as a signature. it does not allow to define an image or a hypertext link. With this in mind, refer to the steps below to add a signature in the Gmail application.

- Open the Gmail app on your Android device and tap the hamburger menu (three horizontal lines at the top left).
- Scroll down until you reach the Settings section.
- Now select the desired account for which you need to add a signature.
- Under General section, press Mobile signature.
- Enter the required text and click D & #39; AGREEMENT.
With this, we conclude the guide on how to add signatures in Gmail. The implementation of the signature for both platforms has been discussed here. Share your point of view on the same topic, in the comments section.
Read more: OpenCamera: Open Source Camera app for Android