
A Virtual Private Network (VPN) is a unique solution for security and privacy needs on the Internet. When they work, they are good, but when they do not, they can leave you puzzled. VPN connections sometimes have occasional problems. Basically, there are hundreds of different VPN error codes, but only a few appear in the majority of cases. If you are using a Windows device and a VPN, it is not uncommon to meet 809 VPN Error.
This error normally occurs when Windows does not allow you to establish a VPN through your firewall. Also, if you are not using a firewall but you are on a NAT device, this error may appear.
The Network Address Translation (NAT) is intended for the retention of IP addresses. It allows private IP networks with unsaved IP addresses to connect to the Internet. NAT normally operates on a router, connecting two or more networks and modifying the unregistered network into legal addresses. NAT devices have a specific way of converting network traffic. When you place a server behind a NAT device and use the IPsec NAT-T environment, you may get this error.
You receive an error message stating:
The network connection between your computer and the VPN server could not be established because the remote server is not responding.
Also, when the error appears, the event log does not display associated logs either, because the traffic does not reach the MX WAN interface.
809 VPN Error Fix on Windows 10
You can choose the following options for troubleshooting the 809 VPN error:
- Enable ports on your firewall / router
- Add value to the Windows registry
- Disable Xbox Live Network Services
- Check the PAP settings
- Disable third-party applications
Let's take a look at these troubleshooting options in detail.
Option 1: Enable ports on your firewall / router:
An 809 "Always On" VPN error code is caused by the PPTP port (TCP 1723) or the L2TP or IKEv2 port (UDP port 500 or 4500) blocked on the VPN server or firewall. The solution is to enable these ports on the firewall or your router. You can try to deploy the VPN tunnel based on SSTP or OpenVPN on your VPN provider. This will allow the VPN connection to work seamlessly across the firewall, NAT, and Web proxies.
Option 2: Add Value to the Windows Registry:
While trying to establish your VPN connection, if your MX is placed behind a NAT, you will have to add the "AssumeUDPEncapsulationContextOnSendRule"DWORD value in the Windows registry. Here's how to do it:
1) Log in to the Windows machine asadmin"
2) Right-click on 'Start & #39; and select 'Running & #39;
3) Type & #39;regeditAnd press'Enter & #39;
4) Locate the entrance "HKEY_LOCAL_MACHINESYSTEMCurrentControlSetServicesPolicyAgent"
5) Right-click and create a new oneDWORD ' (32 bits) value.
6) Add RegValue "AssumeUDPEncapsulationContextOnSendRule"And click on"D & #39; agreement'To save the changes.
7) Modify the new entry and modify the value data of "0" at "2".
8) Restart the computer and test the connection
NoteThis is ideal when your virtual private network server and computer client are behind NAT devices.
Option 3: Disable Xbox Live Network Services:
For Windows 10 users, the antivirus may be incompatible with the operating system, resulting in the rejection of IPsec connections. A Windows 10 service can block access to the L2TP / IPsec VPN. To resolve this problem, follow these steps:
1) In theSearch bar"Type"Services"
2) Among the results, click on 'Services"
3) locateXbox Live networking services'And disable it.

Your VPN connection should work and the VPN 809 error should disappear.
Option 4: Check PAP Settings:
Follow these steps to check if your PAP settings are configured correctly:
1) Click on 'beginning»And select«Settings"
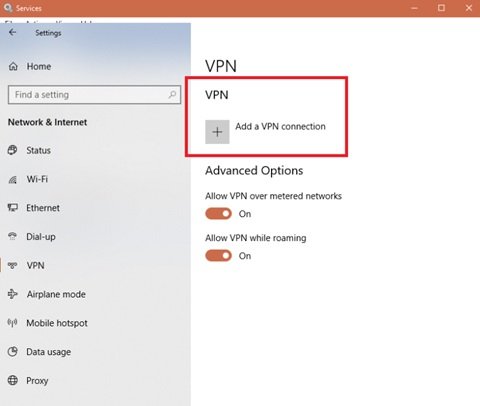
2) Select 'Network and Internet& #39; And choose & #39;VPN '
3) Now you will need toAdd a VPN"By providing a name of the connection, User name, and password.
4) Now from 'properties, select 'security»Then arrived atAdvanced settings'Option.
5) Under "Authentication», Select 'Allow these protocolsThen check only theBOILED& #39; box.
Now, restart the system to confirm if the error has disappeared.
Option 5: Disable third-party applications:
Sometimes third-party applications on the device may be the cause of the 809 VPN error. Here you will have to individually determine which application is causing the problem. This can be an annoying option, but once you disable the guilty application, the error should disappear.
VPN Error 809 is a very common VPN problem that every user will be confronted from time to time. The options listed above will help you solve this problem in no time.
Related reading: Troubleshooting and Solutions to Common VPN Error Codes.